
Porting the supercharger, page 2.
Port matching with the intake plenum.
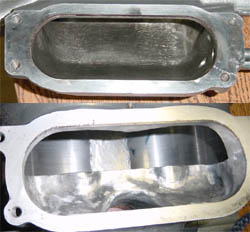
Now the fun begins!!! Well opening both the intake plenum and blower inlet to the same size has benefits. First the openings will be both be larger, that means more air in the spaces which is good. Also both being the same size you will not have and "ledges" that could cause airflow problems, but please note: you must align them properly or you will have ledges. Since I am new to most of this, I decided to open holes up the size of the gasket. This is a little bigger then they came, and since you have the gasket as the templet it makes it much easier.
| Well some more power and airflow to be added here. The idea is to make the exit on the upper intake plenum and entrance on the blower the same exact size. The easiest way to do this is to match both openings to the size of the gasket. Stock wasn't that off, but a few parts were as much as 1/8" off. So first thing is to correctly align the gasket on the opening: | |
| Once the gasket is aligned properly you can then take a black marker and mark off the area not covered by the gasket: | |
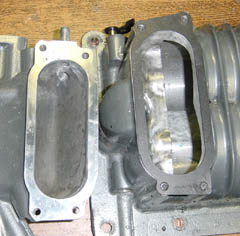
| Now that you have marked the area that needs to be grinded off, go to town. I used a dremel flap wheel and sanding wheel (went through a few of those). You will have a lot of shavings, so don't worry about wiping them off and putting the gasket back on to marker of the area again. After about an hour of that between the blower and plenum I was done. I made the blower inlet a tad bit larger then the plenum opening to help prevent miss-alignment when putting it back together. Heres what the grinded of part looks like (not smoothed though) : | |
Removing inlet material.
If you look into the blower casing from the top of the inlet, you will see the 2 cylinders weres the rotors go, and how it is molded to a point in them. In this picture you can see it clearly. Well, that something that can be removed to put get the air to load into the rotors quickly. Let me say it's no easy task at all. To do this I used a file, for a very long time. When I was finally satisfied with much I filed off, or maybe it was my arms were to tired, I whipped out the flapwheel and went to town to get it as smooth as possible. Here is a good picture of it done. This is what mine looked like:
| In this pic you can see how much material I removed and the angle I removed it at. | 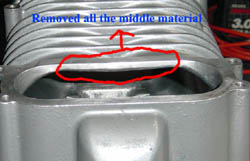 |
Here you can how it looks from the inside of the blower casing. | 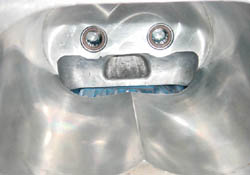 |
Opening the blower outlet.
Let me say, without a CNC machine or any of those other wonderfull "remove material easy machines", this sucks!!! Flap wheels, sanding wheels, and files + alot of time = I opened the outlet about 1/8". And it was a long 1/8" inch.
| Here you can see the blower outlet was opened up about 1/8" all the way. In the bottom corners you will also notice that is filed down flat instead of round (see pic below for refrence pointers). | 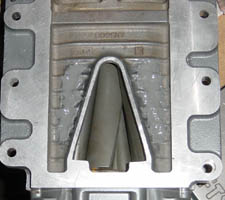 |
Covering the 4 holes.
In the blower casing, if you haven't noticed yet, there are 4 small oval holes. Don't bother clean them up. They were put in there as a way to make the blower quiter at the sacrafice of a little power. So we plug them up. This is easy. Scuff up the holes, scuff up the bottom of the blower. Put tape over the holes on the inside of blower. Then mix up alot of JB Weld and just poor it over. It takes about 15 hours to dry, but this stuff will hold.
| Here you can see the holes cover up, (and more of what I filed down). | 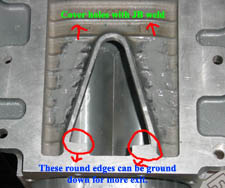 |