Porting the supercharger.
Forward: A few of the pics in this FAQ are from Dale's supercharger. Alot of the information I have and work I've done were suggestions by Dale, and I can't thank him enough for helping. Because who knows what they I would have done without guidence.
Overview.
Well there has to be some more power out of the stock supercharger. It's not a lot, but better then stock. And the way I see it (for me) a couple flap wheels, some sand paper and buffing materials is a lot cheaper then $3,000 for an aftermarker blower for those that want a little bit more. Do note however, that if you want to push the stock blower well past it's limits that an aftermarket blower such as the Works or Kenne Bell is the way to go. I only run a 2lb lower pulley, so for me an aftermarket blower will not offer much gains over stock, and if I can get some more power out of it, it is all the more worth it for me.
Here is where you have to make a choice on what you want to do. 1) remove all the rough spots and smooth it out, or 2) make the openings bigger and do everything possible to get more flow. I opted for option 2. Everything I'm going to do:
- Smooth out all rough spots.
- Open the outlet port to flow more air.
- Port match the plenum and blower inlet to the gasket size.
- Seal up the holes.
Tools used.
- Dremel with the flex cable attachment
- Various dremel bits, inlcuding: grinding wheel, sanding bandwheel, sanding flap wheel
- 100, 150, 300, 400 grit sandpaper
- buffing compound and a buffer, preferably for the dremel.
- Face mask and goggles - aluminum dust is very bad for you and you don't want little chunks in your eyes
|
|
Remove the supercharger.
First thing is to remove the supercharger. It is very straight forward. This was actually much easier then I thought it would be. Some of the bolts (read the rear ones) were the harder ones. Mostly because it's hard to get a wrench back there and generate enough torque to bust it loose. After you have the supercharger pulled of you have a complete view of the intercooler. Below is mine, after 13k miles of sucking in oil through this is what it looks like:
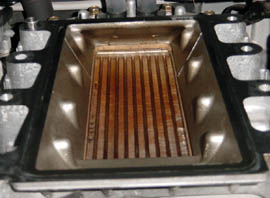
... I'm scared to pull the intercooler off and completely clean it. But thats for the winter when I port and polish the lower intake manifold.
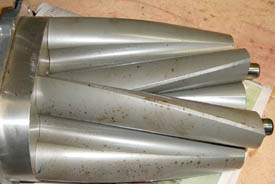
After about 6k miles with a 2lb pulley the rotors will still in good shape. Only a few parts the rotor coating was starting to flake off.
What needs porting/polishing.
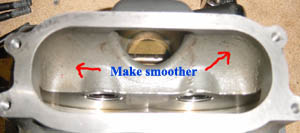
Well the first and most obvious is any parts that have the rough casting need to be smoothed. The second is port matching the blower inlet and intake plenum to the exact size. The easiest is gasket matching them to the some size. So when looking in through the top you can see the first part is very rough, and it stays ruff all the way down to butterfly, on the underside you can see it's nice an smooth though. Here is pics of the intake that need cleaning up:
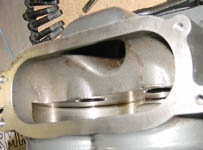
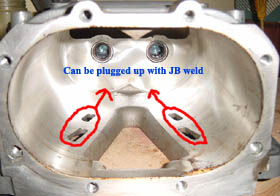
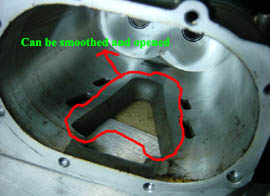
The inside of the blower casing is very smoothing, except for the area the air exits and enters. There is the big triangle shaped hole which needs porting and smoothing Also the middle line about an 1' in width that leads to the back wall is very rough and could use smoothing. The inlet also needs smoothing. You will also notice that there are 4 little oval holes, these were put there to make the blower a little quiter at the loss of some power, so they will be plugged up.
Basic clean-up.
First thing I did was was remove all the rough areas. Believe me this is the easiest part. Just grab the 80 grit or 120 grit flapwheel and go over everything that was rough. Simple enough:
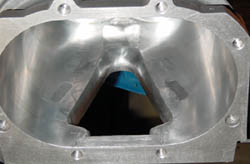
| In this picture you can see I removed alot more then just the roughness, but I will go into that later. At this point you should only be concerned with making it smoother.
Note:If you notice, the blower holes are covered, I will go into this later also. |
 |
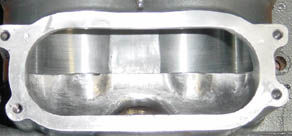
| This area is a little tricky to get to. Just be patient and make sure you have the flex attachment. It does wonders for getting into the bypass tunnel, and all I did was smooth that the best I could, then left it be.
Note: The opening is larger then the stock opening. (I had already portmatched when I took this pic). |
 |
Now if you chose to just do optiong 1, then at this point you are all done. But I insist that you read on to as there are other very easy to do steps (actually just 1).
Page 2


