
Making an oil separator.
( Credit goes to Jay Lincoln since this is almost an exact copy of his, only things different is filter and hose sizes )
If you have never noticed, our lightning engines have this problem with getting oil in the intake. This is not a good thing at all. The oil fouls up the throttle body, gets into the supercharger which is not good for it or the special coating on the rotor blades, it then works it way into the intercooler fouling that up also which makes it less efficient, and it ends it's journey inside the cylinders where it also fouls up the spark plugs and burns giving you that nice "burning oil white smoke".
Now how does this happen, well it's all because of the placement of the PCV vavle. The PCV is placed ontop of the vavle cover, but on the inside there is no shield or plate preventing oil from getting onto the valve. When driving out trucks and we get on them the boost rises, as soon as we take our foot of the pedal the throttle body closes letting less air in. But the engine is still reved up and wants to suck air in. So part of the air it gets is what goes through the PCV, and since oil can get on that the engine eventually sucks it through into the intake.
The solution is not a complicated one. It involves a simple air filter from a air compressor. What this does is it allows the engine to suck in air while preventing oil from getting in. Please note: this is not 100% effective, oil can and will still get through, but *most* of the oil will not.
How it works.
Testing is still in progress. So far I have driven about 10 miles and it has caught a little over a tablespoon of oil. Also only a little bit of oil has gotten on the filter. More testing will be done and updated though.
I have to say with the small original filter I used, that had some oil caught it my short drive to work, but that filter also didn't filter all of the oil, alot still got through. Since this system is noticably larger with both the filter and the tubing, I think it may take a few days of driving to get some good test results.
Parts
|
|
|
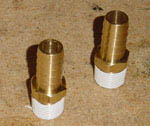
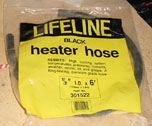
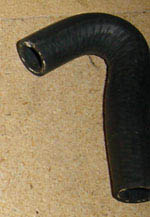
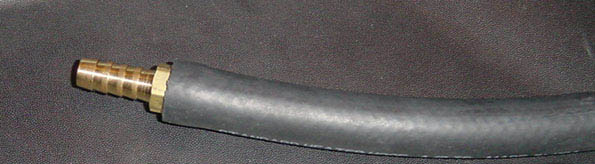
| 1/2" barb with 3/8 male end, x2 (from specialty hose store) | Radiator U-shaped hose, 1/2". (part # (A)71359CS from PepBoys) | 1/2" Heater hose, 6ft. (from PepBoys) |
 |
 |
 |
 |
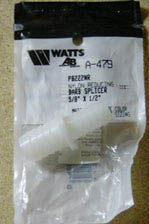
| Amflo 3/8" filter. (from Home Depot) | Nylon splicer. One end 5/8", other end 1/2". (from Home Depot) | Radiator L-shaped hose, 5/8". (part # (A)70785 from PepBoys) | Brass barb splicer, 1/2" each end. (from Home Depot) |
Construction
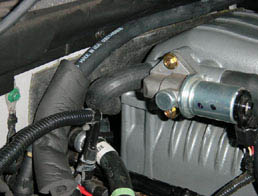
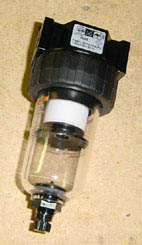
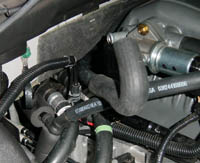
First thing I did was the easy part. Remove the original plastic hose and fitting from the intake plenum. Now it's time for the actual fitting of the new parts. Put some teflon tape on the 3/8" end of the 1/2" barbs. Then put both of them on the filter itself. Tighten as much as possible. Completed:
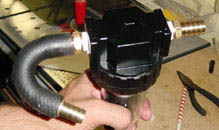
Step 2, get ready to run the tubing. First take the L-shaped hose put the nylon 5/8" barb end on the bottom of it (end furthest from the curve). Then take one end of the 1/2" tubing and connect that to the 1/2" end of the nylon barb. Now the L-hose is connected to the normal hose, and best part of it is that the L-hose is 5/8" which fits perfectly onto the the intake plenum, while the hose is 1/2" and the nylon barb connects the two perfectly. Next take the other end of the 1/2" heater hose (I know it's 6', but it will all work out) and connect it to the top of the fitting where the initial plastic hose was removed. I did mine a wierd wrong way, since I had nothing decent to connect a 1/2" hose to a 3/8" I was forced to improvise. I took a hose repair that had a 3/8" barb and stuffed the threaded end into the 1/2" tubing, which fit nicely, leaving the 3/8" barb sticking out, perfect to connect to the 3/8" fitting.
So run the tubing now, exactly how it's going to be later. I placed the L-hose on the intake plenum and ran the tubing behind the blower. Once I got it to where I was going to mount the filter I looped the hose around behind the blower again and connect the 3/8" barb to the rubber t-fitting. So now all 6'of the hose is used in a big loop and 2 of the connecters are in place.
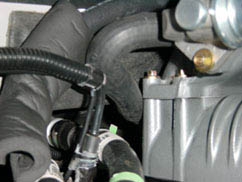
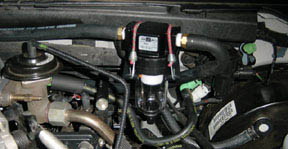
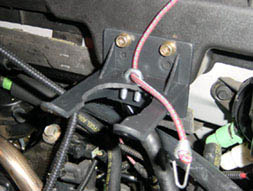
Now it's time to mount the filter. On the drivers side there are 4 holes in the plastic wire holder, perfect starting point. At home depot I found a plastic holder that I modified to hold the filter. I cut out the middle a little bit so that the filter dropped in and hooked up a little connecter so that a mini bungie cord could be placed over the filter to hold it securely. Mounting the holder was easy, I just pulled of the plastic wire holder enough to get a 1/4" rachet behind there, and used 2 bolts to hold it in place.
Once done, I mounted the filter. I then took the tubing that was ran and cut it to fit. The tub that goes from the PCV valve connects to the inlet on the filter, cut the tube so that it has a little room to connect to the barb. Next is the tube existing the filter and going to the plenum, cut that one to fit also. When you are done you should have removed about 1.5' from the middle of the original tubing.
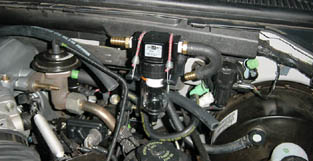
Now just connect the last 2 pieces of tubing to the filter and you are all done. It would be a good idea to double check your work, making sure that the line from the PCV vavle goes to the input of the filter and the line out of the filter goes to the intake plenum.